Propagating seeds is one of my favorite parts of gardening. Knowing that you've taken part in a plant thriving from start to finish just feels good. And it's always awesome watching a seedling break through the soil. I prefer to start seeds inside in a seeding cabinet that I made some time ago. There are several benefits. For one, I can start a lot of seedling in a small space. The cabinet has about 1' x 2 1/2' of floor space and is about 3' tall. It takes up very little room, yet I can start a tremendous amount of plants in it. A 98 cube slab of rockwool fits in the cabinet easily, and I can fit even more using my preferred method of seeding using coco coir (http://trinityaquaponics.blogspot.com/2011/08/coco-coir-and-seeds.html). I like to call that method high density seeding. You can plant several seeds in one place and separate them carefully once they emerge and grow to an inch or two. You have to be very careful with the taproot when doing that, though.
Seeding Cabinet with light on (cabinet can be painted to block out light.)
Seeding tray inside of cabinet.
Building the cabinet was very easy and pretty inexpensive. I purchased a short sterilite garage cabinet to house everything. I attached four light bulb sockets to the top (horizontally to make the most use out of the lights) and wired them using a cheap extension cord. I won't go into details on that here, but a quick google search or even talking to an employee at a home improvement store will provide you all you need to know. In the bottom of the cabinet I used a hole saw to drill a passive intake hole for air current. I also drilled a couple of holes in the shelf that whatever I'm seeding in sits on to increase airflow from the intake to outtake. Another hole further up on the cabinet created an outtake. To ensure airflow I used a reused PC fan and a/c phone charger. The PC fan is wired to the phone charger, which can be plugged into any power outlet. You simply snip the phone connection off the end of the charger, strip the two wires, and splice them with the two wires from the PC fan. You may have to switch the wires once to get the right wires spliced together. Be very careful when doing this, electricity is no joke. You can hurt yourself very badly if you aren't careful, and I'd suggest searching on google for a more in depth description of how to do this. The only other thing to do was to get a pack of cfl bulbs and a surge protector to plug the lights and fan into. I like compact fluorescent lights because they put out a lot of light relative to heat. With four 12-20 watt cfl bulbs the PC fan will keep the cabinet at just above room temperature.
Lights attached to the top of the cabinet. The hole in the middle is where the PC fan is.
PC fan attached to the back of the cabinet.
Surge protector with lights an fan plugged in.
Plug the surge protector to a wall outlet and you're ready to go. You can now seed whichever way you prefer so long as it fits in the cabinet. I highly recommend trying out the coco coir method, but there are many options and it's pretty much all about preference.
Last night Houston, Texas got the first storm it's seen in awhile. In celebration I decided to take a post from another blog I manage and share it with everybody here on Good Time Gardening.
Right now the vast majority of Texas is in what is labeled an "exceptional" drought. "Really fucking bad" drought would be more accurate. Here in Houston we've just been hit with water restrictions. Outdoor watering is now limited to two days a week. And, honestly, I'm surprised it took so long. We've only received 40% of our normal rainfall since January. I can't even remember the last time it rained, and I'll probably be shocked the next time it does. So, can you take advantage of the rain when it does occur without investing a lot of money in a rain harvesting system? Sure can.
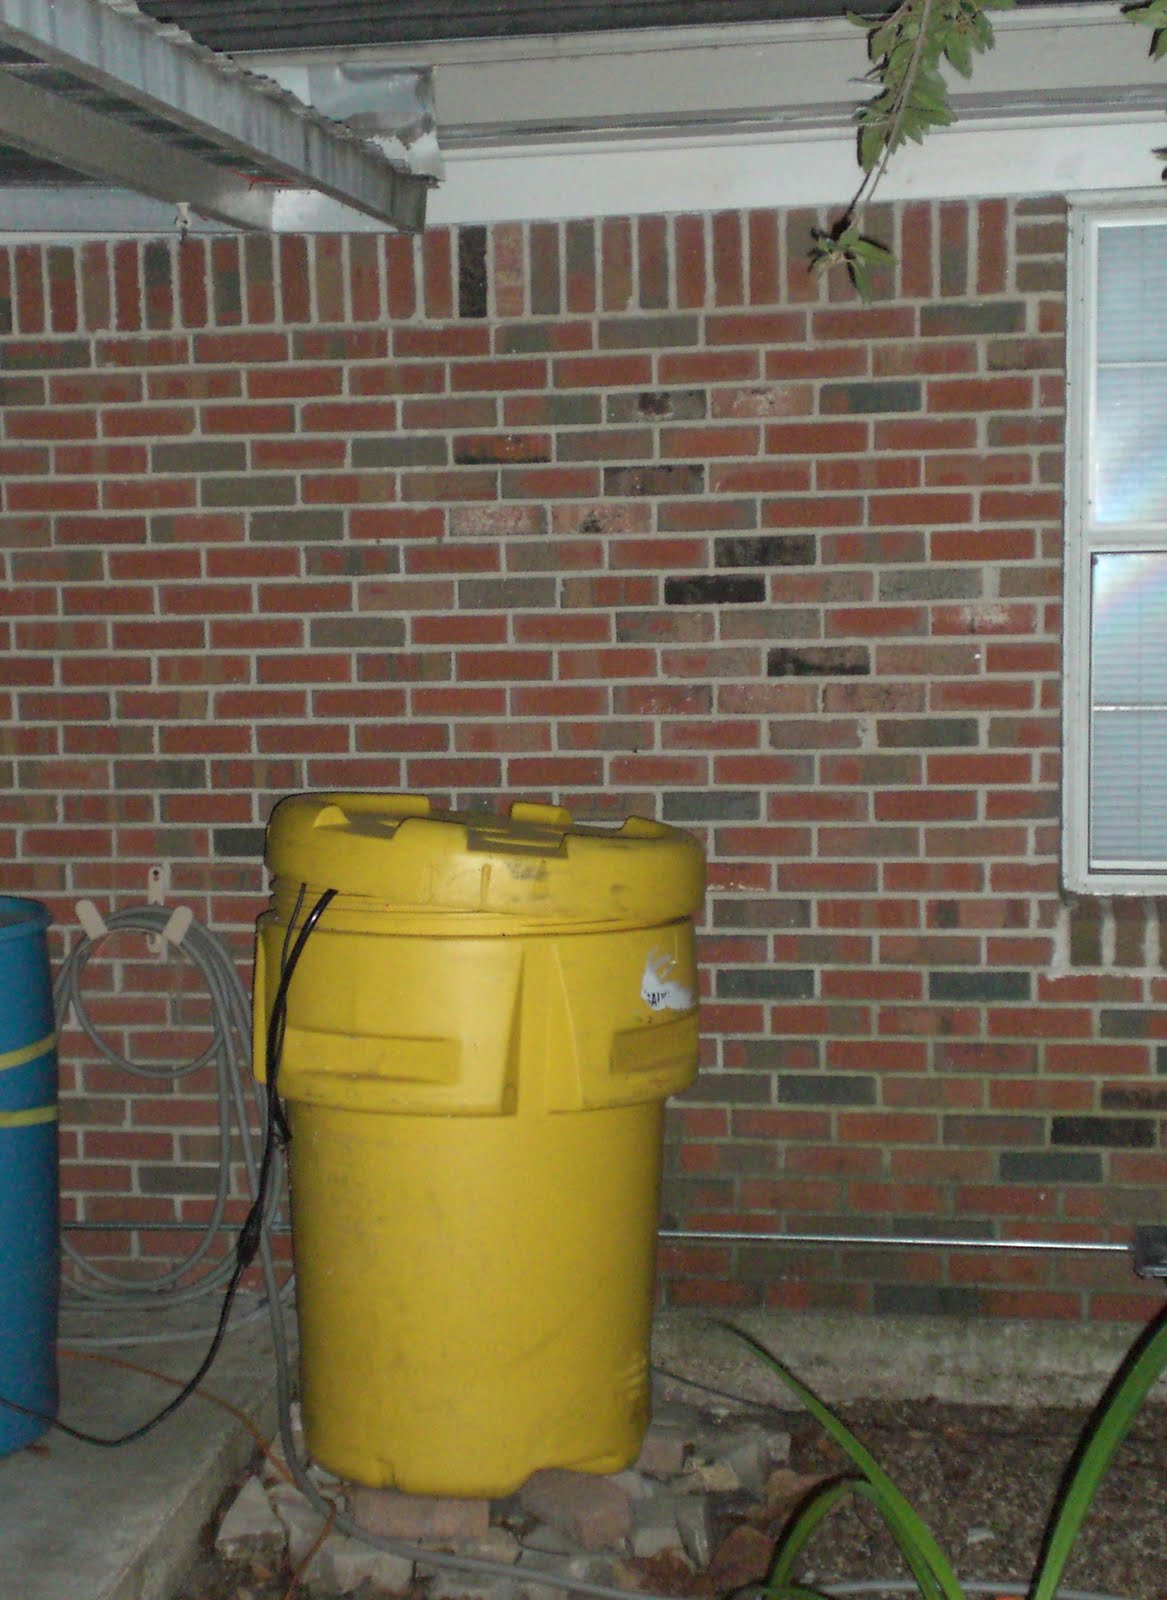
Rain harvesting made easy
The picture above shows just how easy it is to collect rain. The spot where the awning meets the house is a low spot, so more water drains at that corner than anywhere else. I threw a container in the spot where the water flows and that's about it. This container is around 75 gallons and it fills up in a few minutes when there is a decent rain. When it gets full I take the hose connected to a water pump inside the yellow container and run it to the blue 50 gallon drum on the left so I can keep collecting water. Very little money invested in this rain collection system.
Collecting this much rain isn't going to do your lawn any good. It'd last a day and you'd be dry again. But it'll last a good while if you just water potted plants or a small garden with it. I use the rain water I collect to top off the aquaponic systems I have in the backyard. All I need is about 10 gallons a week for a growing area of 4' x 8'. That's pretty damn water efficient for a gardening system. In a traditional soil garden I'd probably go through that in a day, and everything would be dry the next. I wouldn't drink the water unless I absolutely had to. But if I needed to, I have some purification tabs that will make the water safe to drink in about 30 minutes.
Collecting rain water in containers this size isn't going to save your lawn. It may not even save your soil garden if it's a large garden. But in certain applications it makes all the difference. Besides, any water you collect and use is water that you don't have to pay for. And I'd say that makes it worth it in and of itself.
One of the great things about gardening in Texas is that our winters aren't typically very harsh, so we can grow late into the year. The past several years it has gotten pretty cold (down to freezing for a day or two) but our winters don't usually set in until December here near the Gulf of Mexico. The trade off is that summer sets in early and it gets brutal outside. This year has been especially dry and hot. When the heat of summer gets here the choices for crops that will keep producing dwindle. Leafy greens such as lettuce will not grow and fruiting crops such as tomatoes stop producing fruit. If you have a soil garden you have the option of simply taking a break until things cool down in the fall, but you can't do that with an aquaponic system. The fish in an aquaponic system rely on plants to filter the water. Fish mortality will rise significantly if this filtering action is lost. So what can you grow during hot summers?
Lemon Balm flowing over the sides of an aquaponic system
One of the easiest varieties of crops to grow in the heat of summer are herbs. Currently I'm growing lemon balm and mint in my aquaponic systems, and they couldn't be doing better. Both are growing out of control! I'm growing some basil, as well. Basil doesn't mind the heat either. Peppers are also a great choice. Most peppers will thrive and produce despite the heat of a Texas summer. I'm currently trying tomatillos in aquaponics. I can state for a fact that tomatillos will thrive in heat with little water in soil, and I have high hopes for them in aquaponics. I started a couple of bean varieties several days ago, along with a pickling variety of cucumber. So far they've been growing well in the heat. The question I'm looking to answer is how well will they do having been started in midsummer, when the worst of the heat is already here.
Bean plants on August 22, 2011
Same plants two days later
As these plants continue to grow I'll be keeping track of their progress. So look out for a post down the line with more information on the results. If you want a safe bet, grow some mint or lemon balm. They won't disappoint.
Since my introduction to horticulture I've worked with both hydroponics and aquaponics. One of the critical issues in both sciences is the quality of water in the system. It's important for the system operator to monitor water quality to ensure that the system continues to run smoothly. If the pH of an aquaponic system swings too high or low it can quickly lead to the death of both the fish and plants stocked in the system. And in hydroponics the ppm (parts per million) measure of nutrients in the system is critical to ensure that the plants do not get nutrient burn from high levels of salts in the water.
The easiest way to monitor water quality is with a meter. Unlike chemical test kits, meters give the user a definitive readout that can be counted on so long as the meters have been calibrated properly. When you get in to testing disolved oxygen and some of the factors dictating water quality, meters can get very expensive. Like up in the $1000's expensive. It almost seems rediculous. But, there are very affordable options out there for pH and ppm meters. And a system operator can easily get away with monitoring these two factors without compromising the system's efficiency. In my experience I've found HANNA to be a company that offers affordable yet reliable solutions for these two tests.
Currently I use both a HANNA pH and ppm meter for all my water quality tests. Both of the meters pictured above have served me well. There have been times that I haven't touched the pH meter for several months, went to calibrate it, and found that it was still spot on. And they've been designed to be extremely easy to use. Calibration of the pH meter requires using a penny or flathead screwdriver to adjust the reading when the electrode is dipped in a 7.0, 4.0, or 10.0 solution. The calibration meter is even more simple. Press and hold the on button until Cal flashes on the display then submerge the probe in a 1382 ppm calibration solution. Then you're off to the races.
Both of these meters together cost me less than $100. And it was probably closer to less than $80. I highly recommend them both. I can't stress the importance of monitoring water quality enough to you. And for the price and quality these meters are going to be near impossible to beat.
This is a pretty cool how-to video on constructing strawberry towers from 4" pvc. It's an easy to build design that is pretty inexpensive. If you don't already have a heat gun then that may be your biggest expense. I've tried this out on some 4" pvc before and it isn't rocket science in the least. Bending the pvc once it has heated up is a pretty simple process that's easy to master halfway through your first tower.
What I really like about this design is the way that the bends form cups that are filled with a soiless medium to be planted in. Another design I've seen simple cuts holes in a length of pvc for net pots. The pvc is filled with expanded clay and plants are planted in the net pots with rockwool. The problem is that when you go to change out plants expanded clay spills out all over the place. The cups in this design make it much easier to plant without making a mess. The only drawback is that there aren't as many plant sites as would be possible with some other designs. But for how easy this is to set up and maintain, it's definitely worth trying out. Even if you had just 5 plant sites per tower you're still planting 4 more plants per square foot than would be possible when growing on a horizontal plane.
This is an awesome little project. I like it a lot. It’s simple, it works, and it’s cheap. What more could you ask for?
I’ve worked with the concept behind these planters in my time as the greenhouse manager for Houston Community College. We conducted research on a planter design from a company in Canada that functioned just like these pots. Water in a reservoir at the bottom of the pot is pulled into the soil through capillary (wicking) action.
The way that these planters function leaves almost no room for overwatering and makes underwatering nearly as hard. As long as the reservoir is kept full capillary action will keep the soil moist, but not too moist. Clear air line tubing, used for aquarium air pumps, could easily be attached to the outer bucket. Then the water level in the reservoir could easily be monitored.
Using black plastic as a cover is great. Limiting the surface area of soil exposed to the elements will significantly cut back on water lost to evaporation. Most of the water will be lost through the transpiration of whatever you plant in the buckets.
And growing organically would be no problem in these buckets. It’s as easy as choosing an organic fertilizer to put in the soil at the startup or even using a water soluble organic fertilizer that could be added with the water when filling up the reservoir. You could even turn this into a hydroponic planter by using a soilless medium (i.e. perlite or vermiculite) and hydroponic nutrients.
What about cost? A pair of 5 gallon buckets will cost you $5.08 at Home Depot (not including tax). A bag of soil doesn’t cost much more, and you probably have string and a black trash bag laying around at home for the cover. Dixie cups are all over the place, so no problem finding one of those. The biggest expense would be getting a drill and hole saws if you don’t already have them. In all, a very inexpensive project if you’re only making a one to several buckets. There are more videos on youtube regarding the actual construction of a global bucket.
Even though aquaponics is my passion, I love this idea for soil planting. First and foremost, the price tag is very cheap. And it’s a very simple project in regards to construction. Once this planter is set up it’ll take very little maintenance to keep your plant/s growing and it won’t take a lot of space. Whether or not you have a green thumb, even if you don’t have much space for gardening this is a great way to grow a few plants. I’d really like to try one out, and if I do I’ll let you guys know how it goes. This idea gets two thumbs up from me.